The Network Domain

March 23rd, 2006

A much-overlooked perk of Mac OS X’s BSD underpinnings is the presence of full-fledged support for NFS (network file system) in every shipping version of the operating system. This support serves as the underlying technology for the “Network Domain,” the fourth member of a family of directory hierarchies that also includes the System, Local, and User domains. Within each of these domains, a predictable directory layout allows for the storage of applications, preferences, fonts, etc., in such a way that a properly-written application can transparently make such resources available to the user as a unified whole.

Most users are probably not familiar with the concept of file-system domains at all. Among those who are, it probably boils down to a vague understanding that stuff in /Library is shared, stuff in the home directory is private, and stuff in /System should not be modified. The mysterious /Network directory is occasionally used to sluggishly locate shared directories from other computers on the LAN (local area network), but is rarely configured to fulfill its complete potential as the Network domain.

A FastScripts user recently contacted me. He works in a newspaper office, and is curious about whether there is any facility in FastScripts for sharing a directory of scripts to his entire team. Frustratingly, I have to tell users like this one that there is support for just such a setup – the network domain – but that setting it up is about the most convoluted Mac OS X task imaginable. It’s so beyond the scope of what any average user should be asked to do, that I’m tempted to implement a custom inter-computer sharing system, just so I can offer my customers a “do it for me” switch. Apple’s advice? “Implementation of the network domain is the responsibility of the network administrator.”

But the network domain is an awesome idea! So it looks like you get to be the network administrator. By setting it up correctly you gain a centralized share for all users of a LAN that benefits not only FastScripts, but any other application that correctly iterates the four domains for supporting files! For this reason, it’s worth knowing how to set up, and worth pressuring Apple to make the setup easier for everyday users. The remainder of this article details the steps you may take to both publish a shared “Library” folder from one computer and subscribe to it from any number of other computers on your LAN.

Configuration: A High Level Overview

Before you tackle the task of setting up your network domain Library folder, you should be familiar with some terms used by the technologies on the Mac.

NetInfo is a unique Mac OS X technology inherited from NeXT. NetInfo is a database that manages many of the attributes of a computer and network that would, on more conventional UNIX systems, be managed entirely with text-based configuration files. Among NetInfo’s many responsibilities is the management NFS automount server and client information for particular machines on a network.

NFS is a UNIX technology for exposing shared directories from one system and mounting them to another. Unlike Apple’s legacy AppleShare system, where mounted servers appear functionally identical to mounted disks, NFS volumes can be attached virtually anywhere in the filesystem you desire (this is true for regular disks as well, but is rarely exploited). For instance, if you want to publish your music collection from one computer and have it show up on all other computers at the path “/MyStuff/ObscurePath/Whatever/Music/”, NetInfo can make that happen. The arbitrary location at which you decide to attach the shared directory is called a “mount point.”

A cool feature of NFS is a sort-of lazy loading technique whereby a mount point can remain unconnected until it is actually needed by some application. The technology responsible for this magic is called “automount.” What’s really cool about automounting an NFS shared volume is that it gracefully handles the absence of either the server or the client. So when you wander outside the realm of your LAN, the funky Music mount point described above simply fails to locate the network resource. Instead of starting a 4-alarm fire, you simply get an “empty” directory.

So bringing this all together, how do we employ the underlying technologies such that we achieve our primary goal? We want a shared network domain Library folder, and the way to do that is by publishing an NFS volume that gets subscribed to with an automount mount point at “/Network/Library”.

On the Server: Publish an NFS Volume

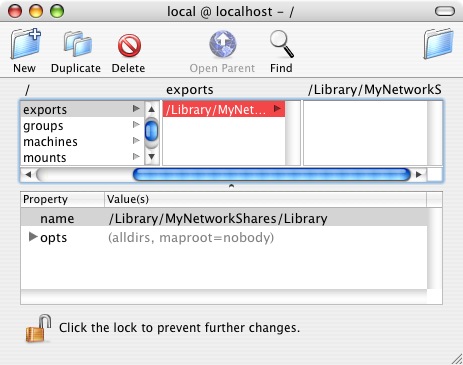
First things first, we need to pick a directory on our “server” box and publish that to the LAN via NFS. In NFS terminology this is called an “export,” and the way this is configured on Mac OS X is via a top-level NetInfo directory entry called “exports.” NetInfo can get really complicated and to make things simple I’m just going to show you how you can add a plain-vanilla NFS export for a folder located at “/Library/MyNetworkShares/Library”. The “nicl” command-line utility makes this relatively straightforward:

sudo nicl . -create /exports/\\/Library\\/MyNetworkShares\\/Library opts alldirs maproot=nobody

Note the crazy backslash overload. That’s because we want to get slashes into the actual name of the directory entry in NetInfo. The same task could be accomplished from the NetInfo Manager application, where you can also confirm visually that the configuration has been made as expected:

Once the NetInfo database has been updated, you can either attempt to ensure that all of the required daemons are reset and recognize the new exports settings, or you can just reboot, which should get the NFS startup item to reload and configure everything corectly. By default the NFS server is enabled, and starts at boot time if there are any exports defined.

To confirm the NFS export is set up and your daemon is operational, simply run the showmount command from the command line on the server:

showmount -e 
Exports list on localhost:
/Library/MyNetworShares/Library           Everyone

Now from another machine (or the same – doesn’t really matter), confirm the ability to actual mount the “volume”. My server machine is identifiable on the local network as “danielG5.local”, so I mount the exported directory on my laptop with:

mkdir /tmp/testmount
mount_nfs danielG5.local:/Library/MyNetworkShares/Library /tmp/testmount

Et voila! /tmp/testmount now looks and acts exactly as the /Library/MyNetworkShares/Library folder on the server.

On the Client: Configure the Network Mount Point

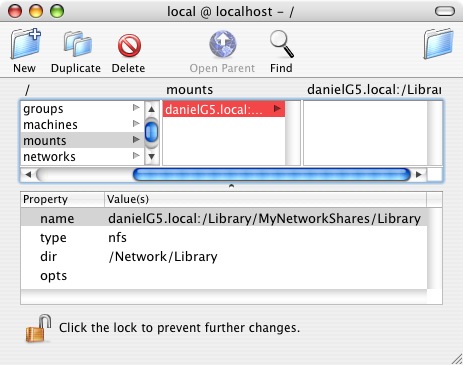
Now that we’ve confirmed the ability to mount the server on a whim, we need to arrange for the client machine to automatically “wire up” to the server whenever the /Network/Library directory is accessed. We do that by configuring a similar NetInfo node to the “exports” item above.

This time, the node resides in “mounts” and serves to inform the automounter about where the network resource is and where it should appear on the local machine. Run the following commands in the terminal, substituting the appropriate computer name for “danielG5.local”:

sudo nicl . -create /mounts/danielG5.local:\\/Library\\/MyNetworkShares\\/Library
sudo nicl . -append /mounts/danielG5.local:\\/Library\\/MyNetworkShares\\/Library type nfs
sudo nicl . -append /mounts/danielG5.local:\\/Library\\/MyNetworkShares\\/Library dir /Network/Library
sudo nicl . -append /mounts/danielG5.local:\\/Library\\/MyNetworkShares\\/Library opts ""

And another visual confirmation from NetInfo Manager puts me at ease:

Again, rebooting is probably the safest way to ensure that the changes are picked up by the automount daemon, but since automount is normally running by default, you should be able to simply restart the daemon:

sudo kill -1 `cat /var/run/automount.pid`

Go ahead and try it out – navigate in the Finder to /Network/Library. You should see the contents of “/Library/MyNetworkShares/Library” from the server computer. I have found the Finder’s concept of /Network to sometimes be a little flakey, so if it doesn’t seem to be working, try changing to the directory from the Terminal instead. I think this kind of thing irons itself out after a reboot. Once you’ve got it wired up, you can start putting junk in the folder that you want to have at your disposal on all machines on the LAN. Fonts, Scripts, etc. If an application doesn’t behave as you expect it to with the Network domain, let the application’s author know (in fact, FastScripts could benefit from a few tweaks to improve its functionality, though it basically works). This is a powerful and very cool infrastructure that more of us should be taking advantage of.

Simplifying the Process

If repeating this process on all the clients in your LAN sounds daunting, fear not. A real network administrator would probably have some kind of sophisticated NetInfo hierarchy through which she could easily manipulate the “mounts” values for all of the machines in the network, but I’m going to assume you’re like me and are just hacking together a solution for a few machines in your house. We can use the “nidump” and “niload” commands to essentially copy and paste the successful settings from one client to another. First, obtain a raw text format copy of the mounts data:

nidump -r /mounts . > MyEasyMounts.txt

Now take that text file to whatever client you like, and load it into that client’s NetInfo database:

sudo niload -m -r /mounts . < MyEasyMounts.txt

Don’t forget to either reboot or confidently reset the automount daemon again.

The process described above can be repeated for other top-level Network domain folders like “Applications.” Just make a different folder on the server and add appropriate exports and mounts entries to the server and clients. Have fun, and enjoy your Network domain!

All Work and No Play Makes a Quiet MacBook Pro

March 13th, 2006

This post is part of the MacBook Pro Complaints series. Instead of (or in addition to) linking directly to this post, consider linking to the series link, which includes a summary of all findings to date and direct links to the pertinent downloads that users may find useful. Thanks for reading!

I’m the (mostly) happy owner of a MacBook Pro (MBP). Like every other MBP owner, I’m excited and happy to have at my portable fingertips unprecedented Mac computing power. Also like every other owner, I’m slowly going insane from the now infamous “hissing/whining” processor noise.

As annoying as this noise is, it’s nothing new to me. I suffered a nearly identical noise on my Dual PowerMac G5, until I discovered through the folk wisdom of the Internet that “disabling CPU napping” would alleviate the problem. Ah – sweet silence! Since that day, I have been flagrantly wasting CPU energy on my Mac by way of the “disable napping” script that runs every time the computer boots. The script relies on extra software provided by Apple’s CHUD tools, and on the rare occasion when my computer has ended up temporarily without those tools, I’ve noticed almost immediately that my brain was once again being bored into by little audio termites.

The problem on the MacBook Pro is generating a lot of discussion on the web. I think it’s worse now because the laptop sits closer to and relatively level to your ears, while the G5 tower often rests somewhere around the corner of your desk and closer to the floor. Annoying whine from an Apple product? No problem, I’ll just pull the ol’ “disable napping” trick. Ha ha! I’m so good at this. What? The Pentium M doesn’t support napping? Sure enough, typing the magical “hwprefs cpu_nap=false” command at the command line returns the very unhelpful “nap not supported by this processor type.”

Over the past few weeks, a number of data points have emerged on the web about what may or may not cause the hissing noise, and what may or may not quell it. Among the most prominent is the observation that “using the built-in iSight” causes the noise to disappear. I tried this the way most people try it, by launching the bundled Photo Booth program. Sure enough. No more noise. But how could that be? I had a hard time believing that there was some magical link between the video circuitry and the “annoying noise” circuitry.

Spotting a link to discussions about the problem in Rentzsch‘s del.icio.us feed, I was reminded to look into the problem more carefully. Personally, though running the Photo Booth application does quiet the noise, it’s not something I feel comfortable doing with my extremely powerful, top-of-the-line Mac notebook!

I sat down at my MBP, intent on getting to the bottom of the problem. I planned to try different things and see what made the noise change or go away. But what’s this? No noise? Try as I might, I couldn’t get irritation to occur. Aha, I noticed at last. I’m plugged in. With the MBP plugged in and charging, apparently the computer doesn’t produce the noise. I was becoming more and more convinced that the problem lay in the CPUs. I disconnected the extremely cool magnetic power connector, and the noises immediately started occurring. If it’s a CPU issue, then perhaps disabling one of the cores will alleviate the problem. Yes, on my machine it certainly did. This is all consistent with the Dual G5 noise problem: when the lazy core has nothing to do, it makes a whining “I’m bored” noise.

It make sense that a video-intensive program like Photo Booth would alleviate the problem. Not because it’s using the built-in iSight, but because it’s furiously processing video data and undoubtedly making the most of that dual-core Pentium chip. Fine – but that means if I’m running Photo Booth I’m taking power away from other programs, like my compiler, that could really make better use of it. Also – the green glow of the iSight camera’s activity LED doesn’t exactly fade into the background. Isn’t there some other program that could keep the CPU just busy enough to stay quiet?

I’m not sure if there is such a program, so I made my own. It turns out that writing an extremely asinine program designed to spin the CPU endlessly does silence the problem. My program simply loops forever comparing the same byte of a string to a character value which it will never be. Pretty stupid, huh? At first I just let it take over the whole CPU, to confirm that the noise would stop, but then I got curious about how much I could yield and still keep the computer quiet. During my experiments, I added a call to usleep() and played with different settings to see at what threshold the noise would come back. In my extremely unscientific tests, the tool has to use around 8% of the (a?) CPU to keep the noise from happening. Arranging for less aggressive use of the CPU resulted in variations on the hissing noise’s rhythm and perceived pitch. I am willing to part with 8% of the CPU if I must, but is there a better way?

I remembered that this is UNIX, and one nice thing about UNIX is the “nice” function call, which sets your priority either lower or higher than the “standard priority.” Apparently nice() has been obsoleted by a newer “setpriority()” call, so if you want your code to be correct you should use that instead. I like using nice() because this is a hack, it works, and I like the way it sounds. Here is my complete “dumbcpu” command-line tool, which should silence your MBP:

main()
{
   char* dummy = "blastedPentiumM";

   // Give this process the lowest possible priority
   (void) nice(20);

   // "Use" that CPU
   while (dummy[0] != 'l')
   {
      // Give the CPU a rest. Use a lower value if it's still noisy.
      usleep(100);
   }
}

For my less programming-minded readers, this is the source code to a complete command line tool that, when compiled, can be run from the Terminal application. If you’re not up for all that, just download the compiled binary, which also includes the source file. [Update: Check out the 1.1 version here, sorry no source for this one]. You should also be able to add the compiled binary to your “Login Items” in order to have the tool run (and your noise silenced) every time you log in to your account. (Update: This wasn’t true at first, but is now that I have changed the binary distribution to a simple application instead of a command-line tool).

How important is it to run this command-line tool instead of Photo Booth? To confirm my suspicions that running Photo Booth was robbing me of valuable processing time, I picked the closest project at hand and timed a clean build of it from the command line with xcodebuild. On my 1GB RAM MBP running full-bore, with annoying whining noises and all it takes almost 8 seconds exactly to complete this build from start to finish. Next I launched Photo Booth and ran the test again. This time it took almost 9 seconds. So Photo Booth is robbing me of 1 out of every 9 seconds. Unacceptable.

Running the above-linked tool quiets my MacBook Pro, yet allows compiles and any other ordinary tasks that want to harness my MBP’s power to complete at full-speed. Observing the behavior of all involved tasks with the “top” command line tool, it’s easy to see how the “dumbcpu” tool drops to nearly 0% CPU use when other, more important tasks are being run.

Does this problem suck? Yes. Does it need to be addressed by Apple before the world goes insane from humming/hissing disease? Yes. Does this little tool work around the problem in a more acceptable way than any other proposal I’ve seen? I humbly suggest that it does.

Update: Smart people like Kevin Ballard and Chris Liscio quickly observed that this tool takes up 100% of the CPU when the machine is idling, which sort of sucks. So to alleviate this, I put back a usleep() call in the while loop. On my MBP usleep(100) seems to cause about an 8% CPU usage, which is still half of what Photo Booth takes, and keeps the CPU quiet. The downloadable binary has also been updated with this change. Thanks Kevin & Chris for pointing this out.

Update 2: I notice a noise still persists when I run the tool, though it’s much less noticeable. I think it’s the “sound of one chip napping” or whatever. I suppose that altering the tool so that it spawned a thread to keep both CPUs busy might seriously silence the MBP. I’ll leave that as an exercise for the concerned reader.

ADC Documentation Bomb

March 8th, 2006

Apple’s documentation team just keeps getting better and better. Not only is the writing clearer and more connected to real-world applications than it has been in the past, the team seems to be getting prolific! Today they dropped a huge update on their site, including a bunch of brand new titles.

The completely new documents:

  • Cocoa Fundamentals Guide – This looks like a new “first stop” document for developers just coming to the platform. But perhaps more importantly for the rest of us, it contains a chapter completely dedicated to Design Patterns and how they relate to Cocoa. Sweet hallelujah! Many developers have been waiting a long time for documentation like this to start coming out of Apple.
  • Cocoa Drawing Guide – This appears to tackle many of the details about how one goes about exposing the advanced facilities of Quartz through a Cocoa-based application. The Advanced Drawing Techniques appears likely to eliminate a lot of mailing list confoundedness. Hopefully the fact that this document shipped with “Alpha Draft – Confidential” at the bottom doesn’t mean it was a mistaken release.
  • View Programming Guide for Cocoa – It just keeps getting better! This one discusses the high-learning-curve tasks associated with creating a custom view in Cocoa, and again includes an “Advanced” section as well as an “Optimization” section for those “wish I could chat with an expert” moments.
  • Scroll View Programming Guide for Cocoa – It may seem strange to find this new document in the midst of others with much larger scope, but I can see how this will come as a great relief to people who have beat their heads against their keyboards while trying to get scroll views to behave as expected. In particular, the concepts discussed in synchronized scroll views should help a lot of people out.

And one major update:

  • Cocoa Scripting Guide – Apparently the result of a merge and rewrite of two previous scripting documents. As anybody who has added scripting support to an application knows, more documentation is always welcomed.

Exciting times. Thanks for the update, Apple!

Red Sweater Links

March 4th, 2006

Those of you who have been reading for a while have probably noticed that I don’t spew dozens of short one-liner entries with a link to something cool and a quick typo-laden comment including my opinions about it. I hope you appreciate this. Sure, it would be quicker to get through than some of my lengthier articles, but I like to think of this as a place where you come to learn something or think about things in a new way, not simply as a bouncing pad to the rest of the universe.

Still, I have the urge to share and comment. Who doesn’t? I’ve been planning for some time to implement a split-personality style solution, similar to Daring Fireball‘s, where the short links live separately from the longer articles. If you’re the kind of person who just wants to read the lengthier, more thoughtful (if I’m having a good day) articles, then do nothing. You’re the one being protected here – nothing will change in the main blog. If however, you wish your NetNewsWire subscription list was just a bit harder to navigate, consider adding Red Sweater Links to your bookmarks list, or subscribe to the RSS Feed.

The implementation of this feature includes some lessons for software developers. See – I’ve been putting this feature off for months for “no good reason.” Specifically, because implementing this properly requires features of WordPress that don’t exist and skills or experience that I don’t have. Ideally, I’d like to have WordPress manage the list of links similarly to how it manages articles in a particular category, but as I said, I don’t want to “taint” the mainline blog. I spent a lot of time thinking about how I might do this. Implement my own custom link management software. Modify WordPress to allow exclusion of a category from aggregate view. Expand the “Links” functionality of WordPress to support more metadata. Look into the version of WordPress that supports multiple blog installations. Blah! It’s too much for my little head to take!

Red Sweater Links is implemented the way many new features are implemented: as a nasty hack that works. I don’t have time to figure out how to do this right. So I made a copy of my blog and embedded the copy within itself. Sick, huh? Good enough for 1.0.

Note: You’re not hallucinating. This feed previously described the new links feature as “Dinky Links.” I thought this was cute for about 5 minutes.