It’s been a little while since I critiqued (or mercilessly attacked, depending on your perspective) an application’s UI. Actually, it hasn’t been that long at all, but I just downloaded and tried the Mac OS X version of Meetro, and we might as well learn from some of their successes and mistakes. Let me just warn anybody loyal to Meetro that this entry will not be high-fives all around.
Like most things in life, it’s easier to spot the mistakes after they’ve been made. I’m sure that anybody looking at the products of my labor would spot problems that I just gloss right over because of my familiarity with them. The criticisms are just my opinion, but they are opinion formed from a long association with the Mac and with understanding pretty well how things are conventionally done. When I see an application with elements that stand out like a sore thumb, I try to learn from it. What could they have done differently to make this application more usable and attractive? Hopefully both Meetro’s authors and the Mac developer community can learn with me as I go over some of this application’s less desirable points. By learning and reinforcing our conception of what makes a good application, even less successful application releases can provide us with some service.
I think I started out in a bad mood because I clicked the big “Download Now!” image and expected to start downloading. Call me crazy but when I see the words download I think of files coming to my computer, not filling out an enrollment form. The image should read “Register Now!”
But I was curious so I went through the registration. Soon enough I was looking at a very pretty DMG mounted on my desktop:

Cute! Nice retro font. Bubbles. Whee! Note the exclamation point at the end of the install advice: it’s a foreboding warning of intensely enthusiastic phrasing soon to come. My only criticism of the DMG is that it asks the user to drag the icon to the Applications folder, but doesn’t offer them a convenient alias to it. At some point within the past few years, some genius figured out that you can put an alias to the Applications folder right on your DMG, so the user doesn’t have to fish around for the folder to perform the drag. I think I first saw it in Fetch, but I’m not sure if that’s where it originated. At this point, it’s caught on enough that I’m disappointed when an application doesn’t have it. At least if you’re not going to have one, don’t emphasize the folder in your advice. Omni products for instance don’t have the convenience, but they at least let the user know that you can drag it anywhere you want to. Lesson: Make it mind-numbingly easy for the user to perform the expected action.
Upon first launching Meetro, it presents a login dialog, similar to what you’d see when running any other chat program:

Pretty nice looking. I might make some little tweaks, but at least it flows well and has a pretty good balance. Now for the numerous nits to pick. The “Status” box looks kind of PC-ish to me, why not just use a static text? Worse: clicking on the text makes it disappear. The group box is probably unnecessary but if it’s used I would like to see an equal amount of whitespace on all sides. The unconventionally narrow margin at the bottom seems to work with the streamlined look of the floating dialog, but what’s with the fat margins on the sides? The dialog has a close box but clicking it doesn’t do anything. Is “screenname” a word? Finally, take note of the number of exclamation points in this dialog: more foreboding! Lesson: Comply with standard Mac UI unless another technique improves the user experience.
But the real problem with this dialog is what happens when I enter my information and click “Log me in!” It doesn’t log me in!!! ZOMG! Now if I’m a normal user I have to sit here and wonder what the hell happened. But since I’m a nerdy user I pop over to the Console to see if the application has spewed anything informative to the standard output. Sure enough, a number of debugging strings have been presented, culminating in:
LLNETNetworkThread: no data received in 65 seconds. Assume disconnected
LLNETNetworkThread: unforced disconnect detected. Do full disconnect, then re-connect!
LLNETOpenConnexion: successfully connected to server 0
So I’ll give Meetro the benefit of the doubt and assume they’re having a bad server day. But this condition was detected so beautifully by the code, only to be trapped inside the application and never conveyed to the user. What was the point of all that careful error handling if you’re just going to leave the user hanging? Even something vague like “There was a problem connecting to Meetro, please try again later” would give me some clue. Lesson: Translate runtime exceptions into meaningful error messages the user can act on.
While I was looking at this failure to login, I thought I’d follow-up on what a regular user might do in such an event. The Help menu beckons.
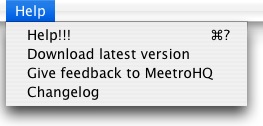
OMG!!! I totally need help. In fact the severity of the application’s failure right now makes the extreme enthusiasm sort of appropriate, but in general it’s not polite to add such enthusiasm to verbs. Let the user decide whether the amount of help they are seeking is “three-bang level” or not. Users like to have unemotional control over their their tools. Can you imagine how ridiculous it would be if all the other devices you use had exclamation points following all the verbs? Honey, we should totally watch TV!!! Yes, I will get the remote!!! Wait, how do I turn it on? Oh Yeah! Just press the “On!!!” button. As a developer, when in doubt, just look at what every other application of note does. Have you ever seen a “Help!!!” menu item before? Lesson: Use emotion-agnostic language in your UI. Don’t attempt to artificially depress or excite the user.
Again, the real problem is what happens when I actually select the help menu item. I’m taken to a web page called the “Meetro FAQ.” OK, fair enough. This is online help. But looking around I can’t help but notice that this is a general purpose FAQ, not one specific to the Mac client. I click on “Platforms” where I finally see mention of Mac OS X. It’s from December, 2005. The good news is that an alpha version is ready for testing. The bad news is that I still seem to be testing it now in June, 2006. Lesson: Lead the user to Help that is highly pertinent or else don’t lead them at all. Don’t bait and switch!
While we’re looking at the Help menu, let’s try out some of the other options. Maybe, even though this product was just announced, and I’m running it on the day of its announcement, I somehow have an outdated buggy version? That option to “Download latest version” looks hopeful. I love it when applications help me stay up to date. But selecting this option does exactly what it says it will do, it links directly to a dmg download, which on my machine causes Safari to start re-downloading the version I’m already running. I don’t need it if it’s the same! Thanks, though. This situation would be made better by using Andy Matuschak’s free Sparkle framework or Tom Harrington’s cool SparklePlus branch, which allows for optional collection of a user’s machine statistics. Since Meetro includes the Growl framework, I know that the company is not averse to open source solutions. Lesson: Empower your users by incorporating de facto standard open source packages. Don’t reinvent the wheel badly.
The “Changelog” menu item doesn’t read well. I’m used to seeing verbs and suddenly I see a noun. How about “View Changelog”? At any rate, when you select it, it takes you to a web page documenting the entire history of the application in all its informal glory. The latest entry is most telling:
v0.51 - Em ti, mprikia kollame; (2006/6/15) - md5: 1b9122f9a9d73037cc923e71545d0172
--------
coming after I wake up, coz I REALLY need sleep (6am)
Ouch! Sorry, whoever you are, and I hope you have a nice rest before waking up to discover that users can’t connect to the service and some snarky blogger just dissected your app. What can we learn from this? The author was so busy and sleep deprived trying to get this release finished that he or she couldn’t even copy/paste the notes of what was changed. This is probably a bad sign for the overall readiness of the release. Lesson: When in doubt, delay the release until adequate testing can be done. Actually, we get two lessons from this one! Lesson: Don’t publicize embarrassing details about your last-minute race to release the application
All told, the Help menu really didn’t help me at all. I still can’t log in and I don’t know whether it’s a problem with the whole service or just with my account. I tried a few more times by quitting and restarting the application, and then decided to check for the possibility of a pertinent Preference item. The Meetro Preferences are reachable through the conventional location, under the application’s self-titled menu in the menu bar:
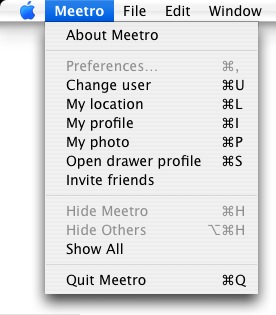
Whoah, crazyville! What are all those items doing in there? You could argue that Meetro is being innovative here and simplifying the user experience by putting everything the user may need to do in one centralized location. The items listed here even seem somewhat consistent with Apple guidelines as they are “items that apply to the application as a whole.” But that doesn’t matter, because nobody puts this much random junk in the application menu. If there’s going to be a change in the tide, I don’t think Meetro is going to be the one to do it. I see this kind of stuff from time to time, where a developer will point out that their highly unusual UI is actual “according to guidelines.” But if nobody else’s applications interpret the guidelines in that way, you’re doing a disservice to users by bucking the system. In the real world, this application should probably have a “Chat” menu or something that houses these related-yet-global items. Lesson: Favor real-world trends over literal interpretation of Apple design guidelines.
Don’t think I’m done with that menu yet. Not matter where it lives, it’s got problems. What stands out in this menu and in the Help menu is the decision by Meetro to shun the conventional capitalization of words in a menu item’s title. You don’t have to look any further than the very menu these items live in to see instances of “proper” capitalization. “Hide Others” and “Show All,” for example. If that’s not enough, look in any menu of any application on your Mac. The lower-cased words in Meetro’s menu items stand out like sore thumbs! On the Mac we capitalize lots of words. It’s like a headline. I can’t imagine just not noticing that every other menu item on the system looked different, so I have to assume this was a conscious decision on Meetro’s part. Do they think their menu items are more correct? Maybe on a PC. Lesson: Do things the Mac way even if you feel it’s the wrong way.
I can’t help but notice that they’ve claimed some awfully ubiquitous keyboard shortcuts for some of their menu items. On a Mac, Cmd-S means “Save” and Cmd-P means “Print.” It’s really confusing to a user for these shortcuts (and Cmd-C, Cmd-V, etc) to be used for anything else. What’s funny here is obviously Cmd-P was claimed for “Photo,” but why was Cmd-S claimed for “Open drawer profile”? And what does that even mean? I assume they meant to call the item “Open Profile Drawer.” Lesson: Avoid conflicts with universally-known keyboard shortcuts.
At this point I’m getting pretty lonely because I still can’t login. So I decide to play around with these menu items. Maybe I can sneak onto the Meetro network through the back door. Whoops! Another UI defect, I mean lesson. Although these menu items are enabled, most of them do nothing in my current state. I thought maybe changing my location or trying to “reset the user” would tickle the system and let me in. But each of them just does nothing. Ditto for all the items, with the exception of “Invite friends.” More bait-and-switch! Lesson: Always disable UI elements that, when selected, will do absolutely nothing.
So what happened with the one item, “Invite friends,” that actually did something? It took me to a web URL where supposedly I would be able to, you know, invite some friends or something. Instead I found the grandaddy of all bad UI: the 404 page not found error:
Page Not Found!

Hrmm... I can't seem to find what you're looking for!
Ouch! But at least it came with that charming Meetro exclamatory tone. Hrmm… we totally screwed up. Have a groovy day! The root of the problem here is probably during development there was a planned invite page, and when it finally got implemented it happened to reside at a different URL than originally planned. This kind of stuff is caught in that simplest of all QA phases: try every menu item once. Lesson: Triple-check external dependencies before releasing your application.
At this point I’ve written quite a lengthy tome and haven’t even been able to login to the service, yet. As I was writing this I hoped that by the time I got this far I’d finally be able to log in and would then see how the rest of the application’s UI stacked up. I suppose it’s a gift from the heavens that I wasn’t able to, since it helped to keep this entry at a nice manageable length.
There you have it, I’m excited to try Meetro and looking forward to a revised edition that lets me log in, among other things. In the mean time, I’m glad to have been reminded of some things to look out for while putting the finishing touches on the 1.0 of a forthcoming application. If I keep it up with entries like this, my product’s release will probably be met by a well-deserved round of criticism. And that will be a beautiful thing, because it means my 1.1 release will totally kick ass.
Update: I finally got logged in. I guess the server is just getting swamped today and the client app is not prepared to handle that very gracefully. Now that I’m logged in I can appreciate the innovative aspects of the application, but it’s a good thing I didn’t get logged in earlier or there’d be a lot more questionable UI to talk about.
I’m going to limit it to just two complaints: it should save my login information and my location between launches. It’s ridiculous to make me type my login when the system keychain is made for exactly this kind of thing. Lesson: Any value likely to stay the same forever, or for a very long time, should only need setting once.